- All Products
- Image Drag And Drop Widget
Image Drag And Drop Widget
https://expertpk.com/shop/image-drag-and-drop-widget-15 https://expertpk.com/web/image/product.template/15/image_1920?unique=8d9966a
Terms and Conditions
30-day money-back guarantee
Shipping: 2-3 Business Days
Introduction
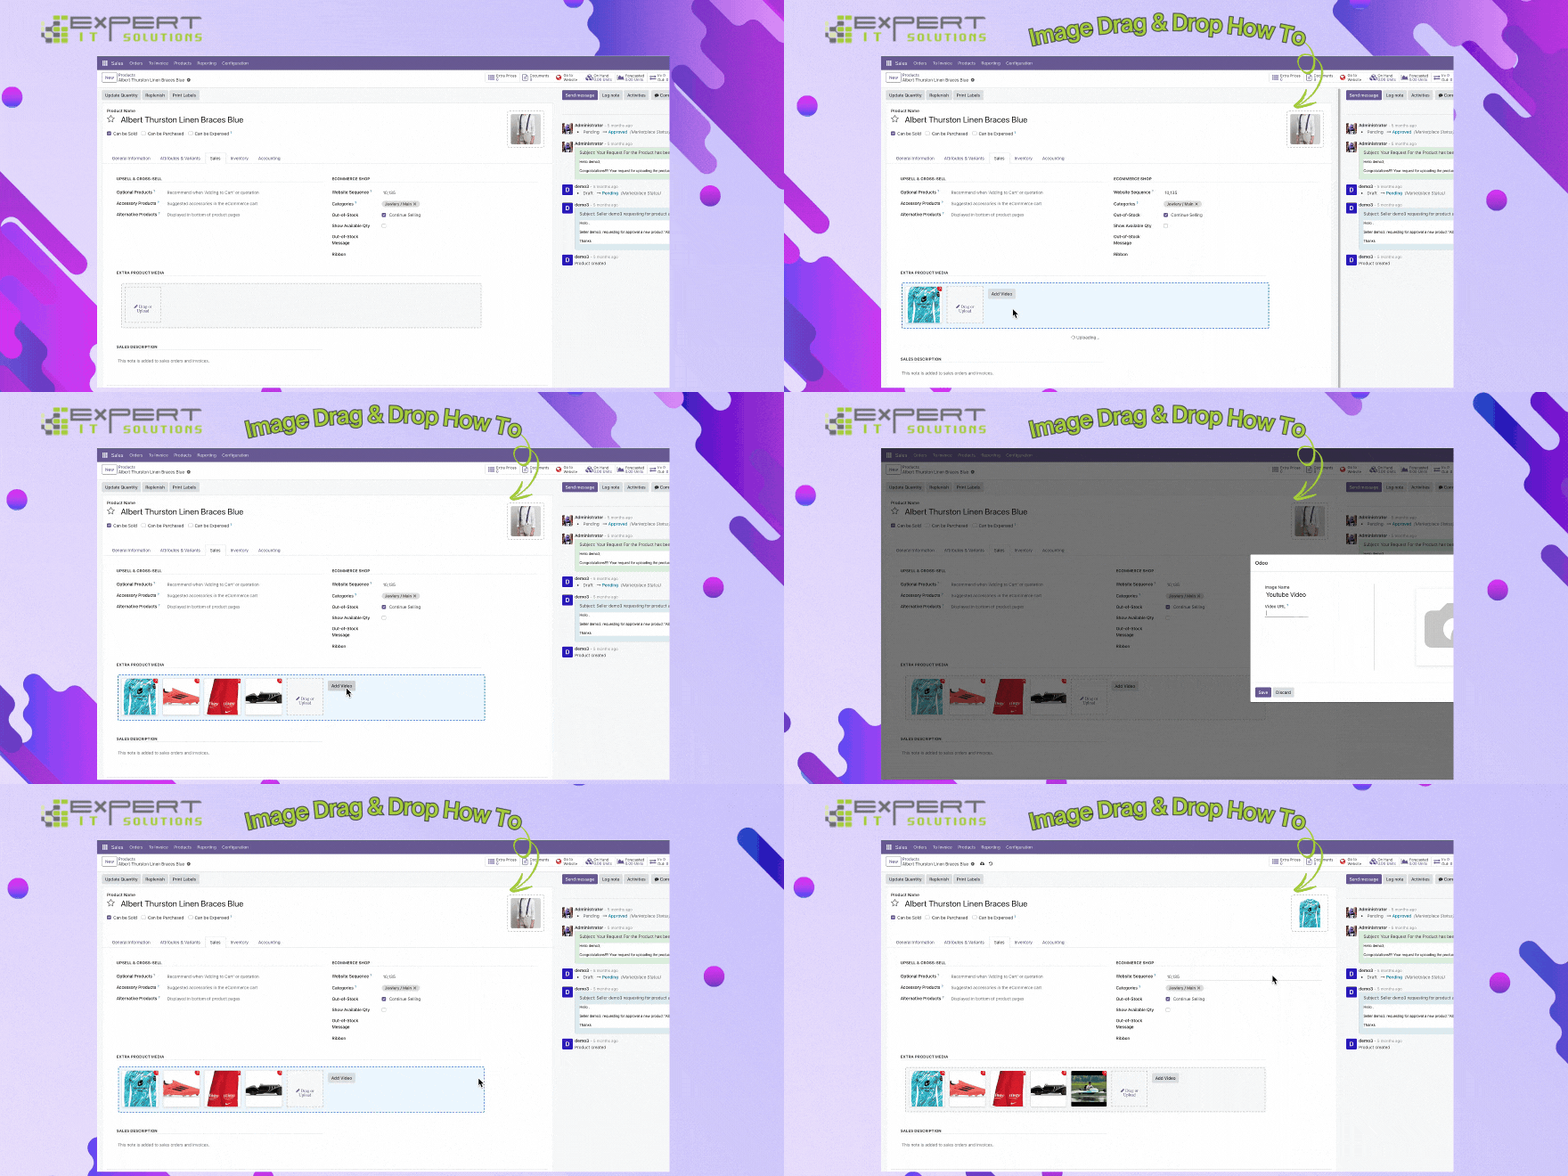
The Images Drag And Drop Widgets module is a state-of-the-art solution designed to enhance your Odoo experience by integrating modern, user-friendly drag and drop image widgets.
Who Can Benefit?
Whether you run an e-commerce site, a media portal, a real estate listing platform, or any business that requires the handling of multiple images per record, this module is built for you. Enjoy:
- E-commerce websites: Easily manage product images with a simple drag and drop interface.
- Businesses with heavy media content: Quickly update portfolios, galleries, and listings.
- Developers and Designers: Seamlessly integrate modern widgets across all modules—no extra dependency required!
Use Cases
Online Stores: Showcase products with multiple images that can be easily updated on-the-fly.
Real Estate Platforms: Effortlessly manage property photos, floor plans, and virtual tours.
Agencies & Portfolios: Create visually appealing portfolios where media speaks louder than words.
Benefits
With our module, say goodbye to tedious file uploads and hello to a more engaging user experience. It’s simple, robust, and designed to boost your productivity!
User Guide
Updating Existing Image Fields
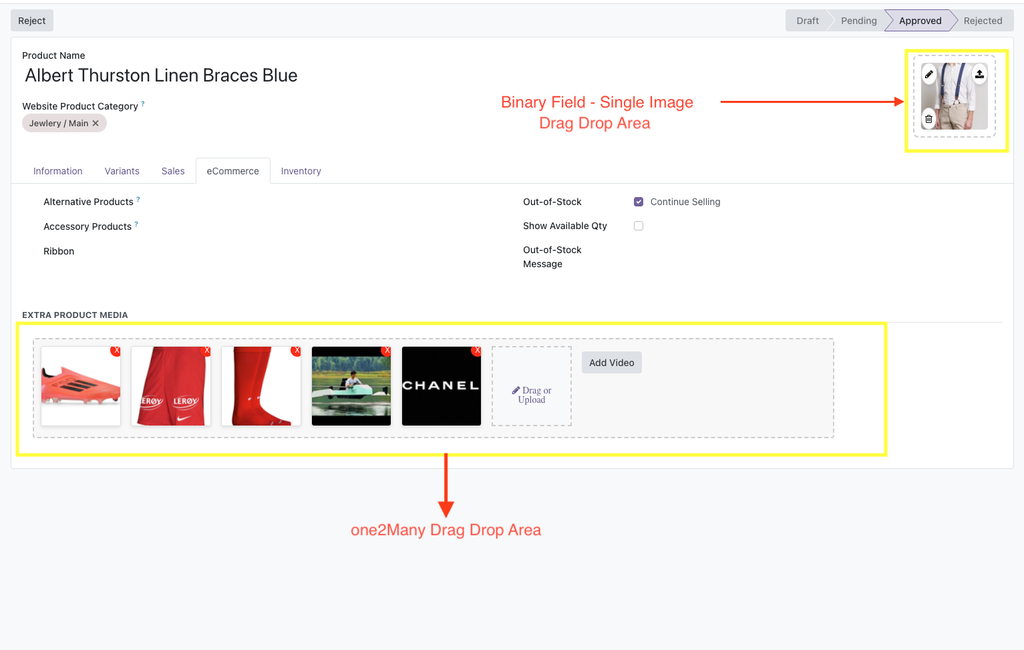
You can update any existing binary image field to use our drag and drop widget without altering your custom modules. Simply update your XML views by setting the widget attribute to:
                        <field name="image_field" widget="d_and_d_image" options="{
                            "image_size": "150x150",
                            "preview_image": "image_128",
                            "acceptedFileExtensions": "image/*",
                            "enableZoom": true,
                            "additionalStyles": "border:2px solid #007bff;"
                            }>
                            </field>
Options Explained:
-
image_size: Defines the display size of the widget. Example: "150x150" sets the width to 150px and height to 150px. -
preview_image: Specifies the field used for the image preview. If not set, it defaults to the binary field name. -
acceptedFileExtensions: Determines which image formats can be uploaded. -
enableZoom: If true, hovering over the image displays a zoom popup. -
additionalStyles: Custom CSS styles that are appended to the widget's inline styles.
Detailed O2M Setup & Custom Integration
For One2Many fields, our widget transforms the standard image upload
into a dynamic drag and drop area.
Note:
The related model
must
have a Kanban
view defined that includes at least the
name
and
image
(or image_1920) fields.
Why a Kanban View? The Kanban view enables the widget to render image previews instead of just record IDs. Without it, you may only see numerical identifiers.
Form View for Videos & Manual Entry: If you wish to add videos or manually add images in the traditional way, ensure that your One2Many field is also accessible via a form view.
Example of One2Many Field Integration
                        <page name="media" string="Extra Media">
                            <field name="media_ids" widget="d_and_d_images"
                            options="{
                            'childImageField': 'image_1920',
                            'extraData': {
                            'categ_id': 1,
                            'enable_zoom': true,
                            'previewImage': 'image_128',
                            'cssStyles': 'width:150px; height:200px; border-radius:15px;'
                            }
                            }"/>
                            </page>
Options Explained:
-
childImageField: Specifies the field in the child model where the binary image data is stored. This is mandatory for the widget to function correctly. If not specified, image_1920 will be used. -
extraData: Allows you to pass additional data to the child records. This can include:-
categ_id: An example field that sets a default category ID. This feature allows you to add any additional field and its value if your model has a required field and without it, it cannot create new records, or a field that you need to fill with static data. -
sale_ok: This is another example field and you can pass any bool value if your required field is bool type -
previewImage: Specifies a smaller image field to use for previews, which is important if you want to show a smaller size image to save bandwidth. This value should be used if your model is inherited fromimage.mixinand you want to display a smaller preview image. -
cssStyles: Custom CSS styles for the image display. Example:"width:150px; height:200px; border-radius:15px; object-fit:cover;".
-
-
acceptedFileExtensions: Determines which file types are acceptable for upload. Default is"image/*".
User Guide
Updating Existing Image Fields
You can update any existing binary image field to use our drag and drop widget without altering your custom modules. Simply update your XML views by setting the widget attribute to:
                        <field name="image_field" widget="d_and_d_image" options="{
                            "image_size": "150x150",
                            "preview_image": "image_128",
                            "acceptedFileExtensions": "image/*",
                            "enableZoom": true,
                            "additionalStyles": "border:2px solid #007bff;"
                            }>
                            </field>
Options Explained:
-
image_size: Defines the display size of the widget. Example: "150x150" sets the width to 150px and height to 150px. -
preview_image: Specifies the field used for the image preview. If not set, it defaults to the binary field name. -
acceptedFileExtensions: Determines which image formats can be uploaded. -
enableZoom: If true, hovering over the image displays a zoom popup. -
additionalStyles: Custom CSS styles that are appended to the widget's inline styles.
Detailed O2M Setup & Custom Integration
For One2Many fields, our widget transforms the standard image upload
into a dynamic drag and drop area.
Note:
The related
model
must
have a Kanban view defined that includes at least
the
name
and
image
(or
image_1920) fields.
Why a Kanban View? The Kanban view enables the widget to render image previews instead of just record IDs. Without it, you may only see numerical identifiers.
Form View for Videos & Manual Entry: If you wish to add videos or manually add images in the traditional way, ensure that your One2Many field is also accessible via a form view.
Example of One2Many Field Integration
                        <page name="media" string="Extra Media">
                            <field name="media_ids" widget="d_and_d_images"
                            options="{
                            'childImageField': 'image_1920',
                            'extraData': {
                            'categ_id': 1,
                            'enable_zoom': true,
                            'previewImage': 'image_128',
                            'cssStyles': 'width:150px; height:200px; border-radius:15px;'
                            }
                            }"/>
                            </page>
Options Explained:
-
childImageField: Specifies the field in the child model where the binary image data is stored. This is mandatory for the widget to function correctly. If not specified,image_1920will be used. -
extraData: Allows you to pass additional data to the child records. This can include:-
categ_id: An example field that sets a default category ID. This feature allows you to add any additional field and its value if your model has a required field and without it, it cannot create new records, or a field that you need to fill with static data. -
sale_ok: This is another example field and you can pass any bool value if your required field is bool type. -
previewImage: Specifies a smaller image field to use for previews, which is important if you want to show a smaller size image to save bandwidth. This value should be used if your model is inherited fromimage.mixinand you want to display a smaller preview image. -
cssStyles: Custom CSS styles for the image display. Example:"width:150px; height:200px; border-radius:15px; object-fit:cover;".
-
-
acceptedFileExtensions: Determines which file types are acceptable for upload. Default is"image/*".
Important Notice!
Do not create the models described in the following example. Odoo already includes these models. This example is provided for educational purposes to help you understand the implementation.
Complete Example (Taken from Odoo builtin Code):
Adding Multiple Image Support to
product.template
Let's say we have a model
product.template
and we need to
add multiple image support to it. We will create a model
product.image
by inheriting from the
image.mixin
class. This way, we automatically get fields
like
image_1920
and other related fields for our model
product.image.
Here are the steps to achieve this:
-
Create the
product.imageModel: Inherit fromimage.mixinto automatically get image-related fields.class ProductImage(models.Model): _name = 'product.image' _inherit = 'image.mixin' product_tmpl_id = fields.Many2one('product.template', string='Product Template') sequence = fields.Integer('Sequence') video_url = fields.Char('Video URL') -
Extend the
product.templateModel: Add a One2Many field to link multiple images.class ProductTemplate(models.Model): _inherit = 'product.template' product_template_image_ids = fields.One2many('product.image', 'product_tmpl_id', string='Images') -
Create a Kanban View for
product.image: Add a Kanban view with the necessary fields.<record id="view_product_image_kanban" model="ir.ui.view"> <field name="name">product.image.kanban</field> <field name="model">product.image</field> <field name="arch" type="xml"> <kanban> <field name="id"/> <field name="name"/> <field name="image_1920" widget="image"/> <field name="sequence"/> </kanban> </field> </record> -
Create a Form View for
product.image: Add a form view with fields for video URL and image.<record id="view_product_image_form" model="ir.ui.view"> <field name="name">product.image.form</field> <field name="model">product.image</field> <field name="arch" type="xml"> <form> <field name="id"/> <field name="name"/> <field name="video_url"/> <field name="image_1920" widget="image"/> </form> </field> </record> -
Update the
product.templateForm View: Add the One2Many field with the drag-and-drop widget.<record id="view_product_template_form" model="ir.ui.view"> <field name="name">product.template.form</field> <field name="model">product.template</field> <field name="inherit_id" ref="product.product_template_only_form_view"/> <field name="arch" type="xml"> <form> <sheet> <group> <field name="product_template_image_ids" widget="d_and_d_images" options="{ 'childImageField': 'image_1920', 'extraData': { 'cssStyles': 'width:150px;height:150px;' } }"/> </group> </sheet> </form> </field> </record>
This guide outlines the necessary steps for integrating d_and_d_images widget for product
template, specifically when using the
website_sale
module, across Odoo 17 and 18. Please carefully follow the instructions for your respective Odoo
version to avoid conflicts and ensure proper functionality.
Odoo 17:
-
Do not duplicate the
product.imagemodel or its views. This model is already provided by thewebsite_salemodule in Odoo. Creating a duplicate will lead to conflicts. -
Inherit the
product.templateform view. . You will modify the form viewproduct.product_template_form_viewto integrate d_and_d_images customizations seamlessly with Odoo's core functionality. -
Customize the image field:
Replace the
product_template_image_idsfield in the inherited form view with d_and_d_images widget as described above to enhance the product image management functionality.
Odoo 18:
Odoo 18 has modified the
product.image
Kanban view by removing certain fields. So, to make it compatible again with our d_and_d_images
widghet, here's how to adjust Odoo 18:
-
Inherit the
product.imageKanban view.website_sale.product_image_view_kanban. Add the necessaryidandnamefields back into the view to maintain existing functionality. That's it. -
Enable modifications through the module's manifest:
- Declare dependency on
website_salein our eis_drag_drop module's__manifest__.pyfile to ensure proper loading order. You jsut need to uncomment the line having website_sale with key depends and then comment the existing depend key. - Reference the XML file containing your Kanban view modifications in the
datakey of the manifest to apply these changes automatically when your module is installed or updated.
- Declare dependency on
-
Alternative approach:
Manually define the Kanban view inheritance in a
product.xmlfile if you prefer more direct control over the modifications.
Our module has pre-configured these enhancements for you. To activate them, modify the
__manifest__.py
file to uncomment the dependency on
website_sale
and the reference to
/views/product.xml
in the
data
key. This ensures all functionalities are seamlessly integrated when you install or update the
module.
Specifications
| Version | 17.0 or 18.0 or 16.0 |
| Tags | |
|---|---|
| Tags |
Downloadable
Odoo Module
|


